Showing posts with label Scrapshotz. Show all posts

Saturday, December 15, 2018

Lawn Fawn Fanatics Challenge #42

Winter Holidays!!

I ran across the Lawn Fawn Snow Cool stamp set in my stash and was inspired to create this double slider surprise card for the challenge:

I created a night sky with Distress Oxide inks in Shaded Lilac, Salty Ocean and Faded Jeans. I then stamped the snow with the snow stamp from the Snow Cool set in embossing ink and then heat embossed with Lawn Fawn textured embossing powder.

 I die cut white glitter card stock with the Lawn Fawn Stitched Hillside borders for the front and slider panels of the card.
All images are coloured with Copic Markers, I used a hole punch to punch "snowballs" from the glitter card stock.

Lastly I stamped the sentiment from die cut strips cut with the rectangle die in the double slider die set and spread them across all three panels.

Thanks so much for taking a look!


Wednesday, November 28, 2018

Less Is More Challenge #385

Hi All!

My first time participating in the Less Is More Challenge and it's a 1 layer card.  I recently purchased some 2" Post It tape and have been wanting to create a card with a masked off stamped area so this challenge was the perfect opportunity to do so!

I placed 2 strips of Post It tape diagonally across the card front and randomly stamped the same snowman image from the Avery Elle Christmas Magic set.

I then copic colored the snowmen and background, drew in the borders with a Copic Multiliner black pen and straight edge. A touch of sparkle on the hats is from Nuvo Glimmer paste and it covered a few areas of imperfect colouring as well.

I really enjoyed this challenge and hope to play along again in the New Year.

Thanks for stopping by!


Thursday, November 22, 2018

Card Challenge: Color Throwdown #520

Hello!
I managed to carve out a wee bit of time to participate in the latest Color Throwdown Challenge #520.

The colors are Kraft, green, brown and cream and here is my card:


I coloured this Gerda Steiner Moody Unicorn with comic markers in warm greys and cream and gave it green hair. The hooves are colored with brown tones of copic markers and the brown and cream patterned paper backgrounders is adhered to a cream card base.


The sentiment is from the The Ton Wave stamp set and is stamped with black Memento Ink on Kraft card stock. The green glitter frame is cut from the Lawn Fawn Reverse Stitched scalloped rectangle window die.

This was such a fun challenge to do, thanks for stopping in to taking a look! :)


Saturday, May 12, 2018

Colour Your Day!

Hello!

I've had a busy last few weeks with back to back scrapbooking/papercrafting events. If you haven't checked out the Scrap Shotz blog, a local online store, click HERE to take a look; I design for the store and help out at the local events so you can see some of the other projects I created for them :).

I have another project to share as I work towards my Altenew Level 2 Educator Certification. This card was inspired by Lesson 1 of the Colour Your Day class


I picked up this Altenew Build A Flower Hibiscus stamp & die set from Scrap Shotz at the recent Scrapbooks and Cards Today event in Calgary. This set is GORGEOUS with 5 stamp layers in the flower!   I pulled out all my blue Altenew Inks and it was pretty cool to see how some were warm blues and others cool blues. These inks are the Glacier Caves Oval set and as the stamp set has 5 layers I double stamped the lightest shade, Arctic Frost for the 2nd layer to have 5 ink colours to use with the stamp layers.

The background was inked with the Altenew Art Deco stencil and Arctic Frost & Persian Blue inks.

The stems were stamped with Altenew Sunkissed and Firebrick ink.


Leaves were stamped with the Altenew Tropical Forest collection and all the images were die cut with the coordinating die.

Lastly, a sentiment from the Wild Hibiscus stamp set was stamped in Altenew Sapphire ink, the card panel matted on Altenew Cherry wood paper and then embellished with Pretty Pink Posh Sea Glass gems.

I will gift this card to my mom for Mother's Day, I think she'll love it!

Have a lovely day and thanks for stopping by!


SaveSaveSaveSaveSaveSaveSaveSave

Thursday, October 12, 2017

|Scrap Shotz October Kit Bonus Project|

Hello!

The Scrap Shotz DT has been unveiling our kit club projects over the past weeks. We are on part 2 of the reveal, you can all my previous projects on the Scrap Shotz blog HERE and HERE

I found one last layout that I forgot to include in my previous Scrap Shotz posts so I'm sharing it here 😁.


There are so many lovely patterns in this kit and I wanted to showcase them here so I punched circles which were then cut in half and arranged in diagonal rows.


I layered 3 photos taken of the backyard at the same time to help showcase how lush this garden is.

 You can see the shine the Studio Katia clear crystals add to the layout, kit stickers also embellish the page.

I used one of of the post its as the journaling block.

Make sure you stop by the Scrap Shotz blog to see all the projects created by the team😊.

Thanks for stopping by!


Thursday, October 5, 2017

Crafting with Concord and 9th

Hello!

I just finished my final October kit projects for Scrap Shotz so I have a small window of time to post some of my latest cards. I've shared most of them on Instagram but I wanted to share them here as well to give you a few details about them. I was asked to create some samples using Concord and 9th products for the booth at the Great Canadian Scrapbook Carnival.

These first two cards use the Concord and 9th Globe Greetings stamp and die set.
 I made a galaxy background using two colours of Distress Ink and white paint, super easy to do! I stamped the earth image with black Versafine ink on heat emboss-able acetate and heat embossed with clear embossing powder.

I die cut multiple circle frames and stacked on top of each other to create the shaker 'pocket' and adhered the acetate earth with liquid glue. The top frame is inked with Clearsnap gold ink and then heat embossed with clear embossing powder.


Sentiment is heat embossed with the same ink and powder as the shaker frame, a smattering of gold sequins completes the card.

This next card is completely different but yes I used the circle die cut and the sentiment from the same C&9th Globe Greetings set.
I brushed Gansai Tambi Pearl watercolours in pink, blue, green and peach on watercolour card stock, dried with a heat tool and then went over the entire panel with Wink of Stella clear glitter.

Sentiment is heat embossed in gold on heat resistant vellum. Liquid glue is placed behind the letters to adhere the vellum to the card stock. Gold sequins accent the panel as well.

These next two cards use the Aloha floral fill in papers and stencils. The 6x6 papers have patterns on one side and then printed foliage on the other side with florals that you can fill in with colour using the stencils.

Here I have applied Altenew ink on the flowers, cut the paper down, die cut thanks multiple times from the same patterned paper and then stacked the words together. A Wink of Stella marker adds some shimmer to the flower centres and die cut word, unfortunately you can not see it in the photo.


The flowers were inked with the stencil and Distress Oxide Ink in Worn Lipstick, then dried with a heat tool. Translucent embossing paste was applied through the second stencil and then set aside to dry. Once the paste was dried, I adhered gold foil with the Minc. I then placed the floral stencil back over the paper and applied embossing ink and clear embossing powder to the flowers and heat set. This now created a resist so I was able to apply Distress ink to the background without also inking the pink flowers. Card is completed with a sentiment from Altenew's Label Love stamp set.


This card uses the Sunshine Turnabout stamp and die. I think I'll be adding this stamp to my collection and maybe turn a few of this design into Christmas cards.
I used the stamp with Ranger sticky embossing powder and after heat setting applied glitter flakes. The matching die cuts a lovely scalloped frame so I cut that out of glitter paper, gold heat embossed the stamp sentiment on white card stock and popped it up with foam tape. A few Studio Katia clear crystals finish off the card.

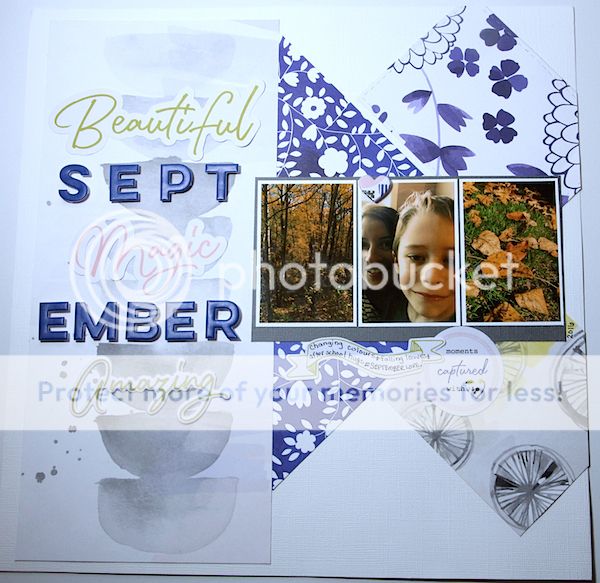
I'll have a few more cards to share and at some point I'd like to put some of these great stamps to use on a scrapbook layout😄.

Thanks for stopping by!


Saturday, July 22, 2017

Many Thanks

Hello Friends!

A little bit ago I shared this Distress Crayon & Ink background with you and a promise to show you the completed card.
As promised, here is the card:


The purple/violet background was die cut with an Elizabeth Craft Designs rectangle die, then layered over a Wild Whisper Designs World's Best line paper from the June Scrap Shotz kit.


The tulips are stamped with Versamark ink & the Altenew Tulip stamp set on kraft card stock, then coloured with Tim Holtz Distress Crayons.


The tulips were then fussy cut, layered over each other with foam tape and accented with glossy accents. I tied twine from a Scrap Shotz kit around the flowers to create a bouquet.
Lastly, the sentiment is cut with a My Favourite Things die, popped up with foam tape and then glazed with glossy accents.

Thanks for stopping by😊

Tuesday, February 28, 2017

February 2017 Scrap Shotz Kit Projects

Hello!
My apologies for the lack of posting lately. I really have been creating but haven't made it here to post much.
Follow me on Instagram to keep up with what I've been up to and also bookmark and/or follow the Scrap Shotz blog as I design for them and post all the details of my monthly kit project creations there.
I wish I had more time to create but life happens and I just fit it in when I can. I am in awe of those who work full time outside the home, raise a family and devote time to their hobbies/passions.
Enough introspection!!

Here's a little taste of what I've been working on lately:
Curious? I hope so, keep checking in to the Scrap Shotz blog to see what this turned in to and to see the rest of my February kit projects😊

Sunday, November 13, 2016

Scrap Shotz October 2016 Kit Reveal...Extras!

Hello All!

I missed posting a couple of my kit projects over on the Scrap Shotz blog so I thought I would share them here. You can head over to the blog to see the first group of projects.

There were 2 patterned papers in this kit that screamed Christmas card to me and I also wanted to put my new MFT yeti stamps to use:


I shaded the beast with Copic markers and die cut using the matching dies. 2 strips of the kit washi tape and Nuvo Crystal drops in clear, gold and autumn red finish it off.

I made a number of cards using card sketches from Operation Write Home and the kit add on 6x6 paper pack. I made a grand total of 11 cards and barely put a dent in the paper pack.


This kit also includes a sheet of paper printed with 3"x4" cards and immediately this card would work perfectly for these ski photos.

Love these copper-y Thickers, just the perfect size for titles. I am sure you can tell I am in love with these Nuvo Crystal Drops as they make an appearance on yet another project of mine ;).


Thanks for stopping by to take a look at these but it's not over yet!
Head over to the Scrap Shotz blog for the last project...I promise no more for October, I have to get started on November projects shortly :).
As always, you can see what the entire DT has done with kit here in the Scrap Shotz gallery.


SaveSave

Wednesday, October 12, 2016

Scrapshotz September 2016 Kit Project Reveal

Hello!

It was busy for me getting these kit projects completed in between trips, I've been out of the country in August, September and October, this is DEFINITELY out of the ordinary around here.

September's kit featured the brand new Indigo Hills line by Pinkfresh Studio, a lovely line, super easy to design with. Here is the last layout I created with the kit, I actually still have one 12x12 sheet of paper left even after 5 layouts and 4 cards:


Beautiful {September} Magic, Amazing


This is such a great line of papers which easily make your photos the star of the layout. I used off cuts of patterned papers, placing them on kit white card stock. The photos were printed with the Polaroid Zero Ink printer. You can see all my Scrapshotz September kit projects over at the Scrapshotz blog so click the link and head on over!

Thanks for popping in :)


SaveSave

Wednesday, August 6, 2014

**Scrap Shotz Summer Kit Reveal**


Welcome to the Scrap Shotz Summer Kit reveal featuring Indian Summer by WRMK!


This is a gorgeous kit and you can check out the details on the kit and the add ons right here.

I was motivated to break out my steel dies for a couple of cards and for this first card I used the Ray of Sunshine cutting plate by Taylored Expressions trimming the die cut frame in half. 

This next card was also created using a Taylored Expressions cutting plate, this time the Proud Peacock plate along with the TE Wispy Wishes stamp set for the sentiment.
The dark brown frame is an Elizabeth Craft Designs Shimmer Sheetz and for the cleanest cut possible you'll need to use a metal adaptor shim.

I wish I could remember the card that inspired this design so I could give it proper credit but I can not recall that info. I love the patterned paper peeking out between the card stock. The butterfly sticker is from the kit sticker sheet and the pearl is from my stash. You could use one of the add on brads in place of the pearl.

I punched out a couple of sizes of circles to go along with this fabulous wood element from the kit that reads "Life is Beautiful". I kept with the circle theme by punching the photo with a circle punch as well. I've misted the patterned paper with Heidi Swapp Colour Shine spray and bordered the paper with twine from The Twinery. The flowers were all created with the Elizabeth Crafts Bunch of Flowers 2 die.

The Proud Peacock cutting plate makes another appearance on this layout as a border on either side of the photo. I've used a few of the remaining pieces from the shimmer sheetz cut used on the card above to fill in some of the negative spaces of the die cut. Those great die cut cards are from the Indian Summer Albums Made Easy cards.

The Scrap Shotz Creative Team was challenged with a showcase theme for this kit instead of a showcase product. I think you can tell by this layout our theme was Summer Fun so I created a layout listing a few of our summer happenings/events so far.

I didn't let any of this kit go to waste as I used the cut out "rays" from the Ray of Sunshine cutting plate and created photo mat corners behind these 2 photos. 

I love these Indian Summer alphas, they look just like leather and they are a clean and simple font super easy to use!

Thanks for stopping by, feel free to ask any questions in the comments and swing on by the Scrap Shotz gallery to see what the entire Creative Team has done with this kit!

Wednesday, July 2, 2014

**Scrap Shotz June Kit Reveal**

Yes it is July so I have to apologize for being so slow at getting this up and for the quality of the photos...of course it was a cloudy day when I photo'd these projects.

There may be some June kits left featuring Simple Stories "Good Day Sunshine", I'm not totally certain about that but click this Scrap Shotz link if you're interested in it and check out the June 1 New Products, some new items just went up a few days ago!

Here we go with my Scrap Shotz June kit projects!

This layout was based on our CT sketch. Love being able to get so many photos on it as well as use a bunch of chipboard I might struggle to use in other circumstances :)

These next 6x8 pages are comprised of kit products and a 6x8 Simple Stories album. I plan to document our family's July 2014 in the album and with the kit products.


The base of this layout was misted a long time ago and the kit paint medium was the perfect complement to the misted colour.

This cloud paper is super easy to use, a lovely base for pretty much any photo!

The kit colour medium is a beautiful color, Maya Gold "Petrol". I stamped a background for this card with a wine cork and end of a paper piercer. 

This next card was super easy as it is made from a 3x4 cut out from the SS paper, a few enamel dots and Elizabeth Crafts peel off "Happy Birthday" sentiment.

This is a fabulous kit, packed full of products and I have soooo much left to work with and use in my July project!

Thanks for stopping by!


Background Bonanza! Scrapaganza Class!

***SOLD OUT*** Join me for an  in-person class focused on mass-producing card front backgrounds ! You'll create 8+ backgrounds using ...