Thursday, June 29, 2017

Card Background: Distress Crayons & Ink


Hello Everyone!

I finally had a chance to try out a technique Jennifer McGuire demonstrated in a video. Here is are the steps I followed:

1. Cut Kraft card stock to 4"x5.25"
2. Choose a stencil, I have used the Tim Holtz Blossom stencil
3. Place stencil on card stock, then apply a white distress crayon through the stencil
4. Allow to dry, I dried overnight.


5. Apply distress ink colour of choice with mini ink blending tool.

6. Let Distress Ink dry.


7. Gently wipe distress ink from the white crayon, crayon acts as a resist.

Pretty simple technique, I will be back to share a few cards created from the couple of backgrounds I made.

Thanks for stopping in ๐Ÿ˜Š

Thursday, May 25, 2017

Hi-Ya, Birthday Wishes and Thanks

Hello!
As I am in between Scrap Shotz Monthly kit club kits I have a wee bit of time to play with some items in my stash.

The following 2 cards feature the Altenew Tulip stamp. I stamped these images on watercolour paper and coloured one with Zig Clean Color Real Brush markers and the other with Gansai Tambi watercolor paints.


 The cherry wood paper is from Altenew as well as the sentiment. Nuvo Crystal drops in Bright Gold finish off the card.


These next 2 cards feature the darling Mama Elephant Tiny Ninjas stamps. The images are stamped in black Memento Ink and colored with Copic markers. The Tim Holtz Diamonds layering stencil and  Tim Holtz Distress Ink in Fossilized Amber and Squeezed Lemonade form the the background for the  ninjas.


I've added Dollar Store sequins and some My Mind's Eye paper from my stash to complete the cards.

Thanks for taking the time to stop by!

Saturday, May 13, 2017

Swing For the Fences

We like to play a game over at the Scrap Shotz forum called layout tag which begins with an inspiration layout for the first player who completes their layout then "tags" the next person on the list  until everyone has created their layout.

This was my layout from the most recent game of tag:

I am sorry I can't recall which paper line this was and it's not available anymore and I used it all up on this layout. The border of baseballs is my favourite part, after that cute thumbs up photo ๐Ÿ˜‰.

I'll be sharing my most recent-April- kit projects on the Scrap Shotz blog beginning tomorrow-Mother's Day-so pop on over to take a look.

Thanks for stopping by!


Wednesday, May 3, 2017

Take a Peek At...

My latest scrapbook project in progress, I am creating with the Scrap Shotz April monthly kit which features the brand new Vicki Boutin line.


I picked up the Iridescent glaze as an add on to the kit and put it to work with the watercolour crayoned stencil included in the kit.


This is all I'm going to show you right now, you'll have to pop back in a few days to see the end result๐Ÿ˜›.

Thanks for stopping in!

Wednesday, April 26, 2017

Latest Crafty/Life Happenings

Spring is slowly coming around, hopefully we've left the 4 letter S-now word behind to be replaced with he R-ain word! Now some sunshine and a little heat and things will start to green up, if it will ever stop snowing, we have more wet snow in the forecast ๐Ÿ˜–.

In March I played along with The Daily Marker 30 Day Colouring Challenge, didn't get a project in every day but definitely did more colouring than I usually do. Here are a few colouring projects:

 I watercolored this Altenew image with Zig Clean Colour watercolour markers.

I applied Tim Holtz Distress Oxide Inks to a piece of Mixed Media paper:
 Then sprinkled water droplets to activate the oxide effect, dried and die cut with the Altenew Hello Sunshine Dies to create the card below:


Crop and Create came to Calgary and I had a great time attending the crop, a couple of classes and helping Sandy out in the store. Looking so forward to next years event๐Ÿ˜Š.

After Crop and Create myself, hubby and our youngest headed to B.C. for a few days for Spring Break.


Then it was back to the city and school, kids activities, etc. until another short break at Easter, yup that's me in my Easter finery below๐Ÿ˜‰

And I can't forget about my Scrap Shotz Monthly Kit projects, you can check them out here:

February Kit
March Kit

Thanks for stopping in, I appreciate and value your time spent here.

Tuesday, February 28, 2017

February 2017 Scrap Shotz Kit Projects

Hello!
My apologies for the lack of posting lately. I really have been creating but haven't made it here to post much.
Follow me on Instagram to keep up with what I've been up to and also bookmark and/or follow the Scrap Shotz blog as I design for them and post all the details of my monthly kit project creations there.
I wish I had more time to create but life happens and I just fit it in when I can. I am in awe of those who work full time outside the home, raise a family and devote time to their hobbies/passions.
Enough introspection!!

Here's a little taste of what I've been working on lately:
Curious? I hope so, keep checking in to the Scrap Shotz blog to see what this turned in to and to see the rest of my February kit projects๐Ÿ˜Š

Tuesday, February 7, 2017

Hello Winter!

Hey All!

We are in another winter deep freeze after a big dump of snow! I'm not complaining though, the local forecast has the temperature above zero by Thursday so the snow won't last too long ;).

My January Scrap Shotz kit projects are up at the SSZ blog so head on over to take a look, click here.

Here is a layout for your viewing pleasure:

Tuesday, January 10, 2017

Scrap Shotz December 2016 Kit

Happy New Year!!

My Scrap Shotz kit reveal for the final month of 2016 is now live over at the blog...here are a few peeks, head over to the SSZ blog for the full reveal :)


Thank you so much for popping in!

Sunday, November 13, 2016

Scrap Shotz October 2016 Kit Reveal...Extras!

Hello All!

I missed posting a couple of my kit projects over on the Scrap Shotz blog so I thought I would share them here. You can head over to the blog to see the first group of projects.

There were 2 patterned papers in this kit that screamed Christmas card to me and I also wanted to put my new MFT yeti stamps to use:


I shaded the beast with Copic markers and die cut using the matching dies. 2 strips of the kit washi tape and Nuvo Crystal drops in clear, gold and autumn red finish it off.

I made a number of cards using card sketches from Operation Write Home and the kit add on 6x6 paper pack. I made a grand total of 11 cards and barely put a dent in the paper pack.


This kit also includes a sheet of paper printed with 3"x4" cards and immediately this card would work perfectly for these ski photos.

Love these copper-y Thickers, just the perfect size for titles. I am sure you can tell I am in love with these Nuvo Crystal Drops as they make an appearance on yet another project of mine ;).


Thanks for stopping by to take a look at these but it's not over yet!
Head over to the Scrap Shotz blog for the last project...I promise no more for October, I have to get started on November projects shortly :).
As always, you can see what the entire DT has done with kit here in the Scrap Shotz gallery.


SaveSave

Wednesday, October 12, 2016

Scrapshotz September 2016 Kit Project Reveal

Hello!

It was busy for me getting these kit projects completed in between trips, I've been out of the country in August, September and October, this is DEFINITELY out of the ordinary around here.

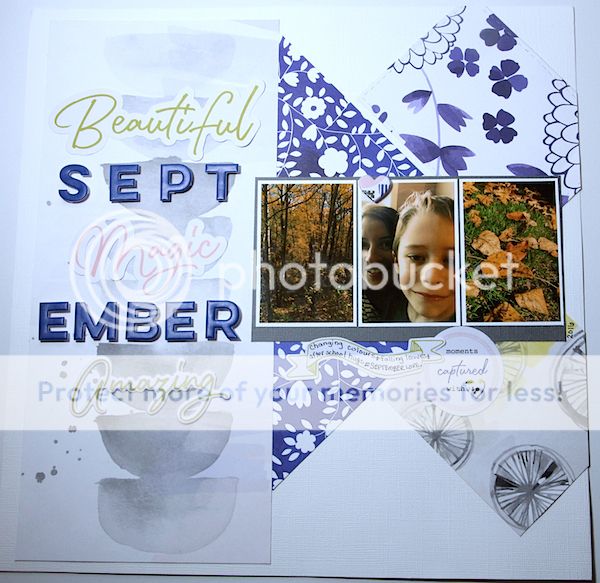
September's kit featured the brand new Indigo Hills line by Pinkfresh Studio, a lovely line, super easy to design with. Here is the last layout I created with the kit, I actually still have one 12x12 sheet of paper left even after 5 layouts and 4 cards:


Beautiful {September} Magic, Amazing


This is such a great line of papers which easily make your photos the star of the layout. I used off cuts of patterned papers, placing them on kit white card stock. The photos were printed with the Polaroid Zero Ink printer. You can see all my Scrapshotz September kit projects over at the Scrapshotz blog so click the link and head on over!

Thanks for popping in :)


SaveSave

Friday, August 19, 2016

One Stamp Set, Two Ways


Hello!
I have returned from a wonderful family vacation and have 2 cards to share, both using the same stamp set each a unique look.

{supplies: Oriental Orchid stamp set-Altenew, Ink-Altenew, die cut frame-Elizabeth Craft Designs, vellum from my stash}

I stamped a series of orchids on card stock layering from the lightest ink to the darkest shade in the set of 4 inks.

I fussy cut each bloom and then arranged them in 3 rows of 3 on kraft card stock, I wasn't entirely thrilled with the result so I topped the arrangement with a piece of vellum and some American Crafts glitter. The die cut frame hides the adhesive used to adhere the vellum to the card stock.


The card is finished off with the thank you sentiment from the stamp set stamped in Versamark black ink and embossed with Ranger clear embossing powder.


{supplies: Altenew Ink and Oriental Orchid stamp set; American Crafts glitter paper; Versamark black ink; Nuvo glitter drops}

I experimented with layering different shades from the Altenew Red Sunset ink set. The flower centers are stamped with the Mango Smoothie ink from the Altenew 4 Scoops ink set. The glitter paper anchors the main sentiment and Nuvo Glitter drops in Silver Moondust complete the card.

Thanks for stopping in :)

Fabulous Festive Folds! Scrapaganza Class!

Fabulous Festive Folds Scrapaganza Class! Join me for this in-person class at the 5th Annual Calgary Scrapaganza ! You’ll create 4 beautifu...